Monday, October 20, 2014

Kale Salad with Champagne Vinaigrette


Kale Salad with Champagne Vinaigrette

For the Salad:
-1 bunch Kale (or 2 bunches of kale if you aren't using baby romaine)
-1 small container of Baby Romaine or Spring Mix 
-6 Eggs
-6 pieces of Bacon (cooked and crumbled)
-1 wedge Aged Manchego
-1 pint basket Grape or Cherry Tomatoes, rinsed
-1/2 bunch Dill, chopped
-Toasted Pumpkin Seeds 
-Maldon Sea Salt & Freshly Ground Black Pepper

For the Vinaigrette:
-Extra Virgin Olive Oil
-Champagne Vinegar
-Dijon Mustard (like Grey Poupon)
-1/2 Shallot, minced
-Kosher Salt
(Any herbs you would like)

To make the Vinaigrette:

Stir together vinegar, mustard, shallot, salt and let sit for about ten minutes. Slowly whisk in olive oil to taste and herbs. This can be made several days in advance. 


To make the Salad:

Strip the leafy part of the kale from the tough stem and tear into bite size pieces. 

Thoroughly wash and spin dry kale and set aside to air dry a little more. (I like to tear it up first, because it makes it easier to wash. Kale sometimes has a lot of dirt on it, so wash well.) 

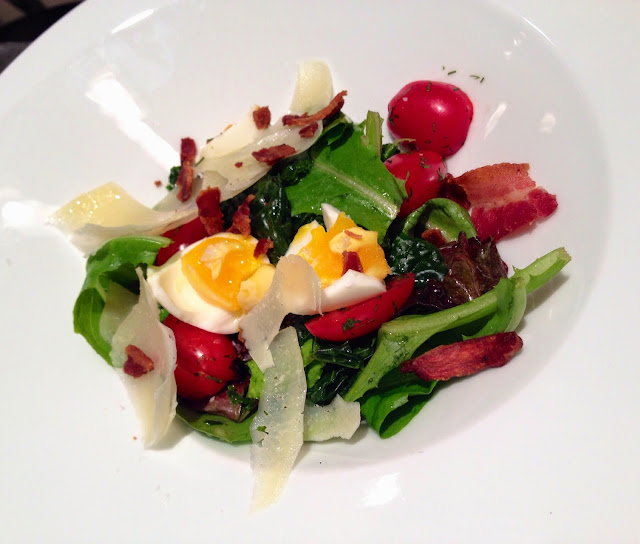
Mix kale with a small amount of vinaigrette in the bowl of a stand mixer for a minute to massage the dressing into the leaves. You can do this by hand if you don't have a stand mixer, it just takes more effort. (Also, I do this because it makes the kale less "fibrous" tasting, you can skip this step entirely if you don't mind the salad being a little chewier.) Bring a medium saucepan full of salted water to a boil and place eggs (directly from fridge) in the water using a spider or slotted spoon. For eggs like the ones pictured (outside of yolk set, inside very slightly runny), cook for 8 minutes and then remove eggs and place in a bowl of ice water to stop the cooking. Once cooled (5-10 minutes), peel and set aside until all ingredients are ready for assembly. 
Using a vegetable peeler, shave the Manchego into long ribbons.
Slice the cherry tomatoes in half lengthwise and toss with a couple of tablespoons of the chopped dill, a pinch of Maldon salt, pepper and a tiny drizzle of the vinaigrette. 
If using the baby romaine, toss it with the kale and add more dressing only if needed. (Originally I was 
planning on making a kale only salad and then ended up having more guests which is why I added the baby romaine that I already had on hand.) Place the kale and romaine on salad plate and top with the cheese, tomatoes, bacon and pumpkin seeds.  Tear the eggs into pieces and place a couple of pieces on each salad. 
(I prefer the rustic look of the torn egg here, but you can slice it if you prefer.) 

Sprinkle the salad with a little extra Maldon salt and some freshly ground black pepper. 


Friday, October 17, 2014

Citrus Green Salad with Pomegranate, Marcona Almonds & Balsamic Vinaigrette


I never get tired of creating new salad combinations. This one combines some of my favorite ingredients: pomegranate seeds, marcona almonds, goat Gouda and a variety of citrus. Today, I used grapefruit, honey tangerines and blood oranges. 

Citrus Green Salad with Pomegranate, Marcona Almonds and Balsamic Vinaigrette 

-1 box mixed salad greens
-2 grapefruits
-2 or 3 Honey Tangerines or regular oranges
-2 or 3 Blood Oranges
-1/2 pint Spanish Marcona Almonds
-Goat Gouda (small wedge), crumbled
-1 pomegranate

Balsamic Vinaigrette
-extra virgin olive oil
-juice from one lemon
-balsamic vinegar
-kosher salt & freshly ground black pepper
-honey
-stoneground Dijon mustard 
-1 garlic clove, crushed

For the vinaigrette: combine lemon juice, balsamic vinegar, salt, pepper, garlic, honey & mustard in a small bowl. Let sit for about ten minutes and then slowly whisk in the olive oil, in a slow steady stream. 

For the salad: cut the grapefruit into supremes. Supremes are segments of citrus that have all of the membrane removed. To do this, cut off both ends and then stand on one flat end. Cut the peel and white pith off following the contour of the piece of fruit rather than cutting straight down. Once all peel and white pith is removed, hold the fruit in your hand (best to do it over a bowl to catch all of the juice) and cut in between the segments, with the blade of the knife following the membranes. The cut fruit will kind of look like the pages of a book and you will end up with membrane free, beautiful fruit segments. For the tangerines and blood oranges I started out like I did when doing supremes, but instead of the last step of cutting the fruit into segments I sliced it into rounds. 
Next, remove the seeds from the pomegranate. I have a very fast, simple technique for doing this and will try to post a video. (Once I figure out how to post videos!) 😒 
To assemble the salad, place the greens in a large bowl and drizzle with a small amount of vinaigrette. (It's always best to start out with too little dressing since you can always add more. Nothing worse than overly dressed, soggy salad in my opinion) Toss the salad and add more vinaigrette if necessary. Place a small amount of greens on each salad plate and top with the citrus, pomegranate seeds, goat cheese and almonds. 


Delicata Squash and Caramelized Onion Tart


This tart is a great fall appetizer for a party. It's quick, can be made ahead of time and beautifully showcases some of my favorite fall flavors. Delicata squash have a flavor similar to butternut squash, but are much easier to work with because of their small size and edible skin. I also love the look of the rings with scalloped edges, (no fancy knife work here) this is how they look when sliced. They are also really pretty to look at when whole and last a long time, so using them in a fall table display of pumpkins and gourds is something I like to do. (Until I'm ready to eat them!) Caramelized onions always make everything taste better, and I especially love them here because they add a bright dimension to this tart both in color and flavor. The onions are finished with balsamic vinegar and red wine which gives them a nice acidity. The caramelized onions last two weeks in your fridge or 2 months in the freezer so feel free to make a batch of them ahead of time. I purposely use more onions than needed so that I extra leftover. They are delicious added to almost anything and everything.  For the crust of the tart I use store bought puff pastry, which means this tart can be rapidly thrown together when you are in a hurry. I love DuFour Puff Pastry. They use all butter in their recipe (no hydrogenated fats or other gross additives) and I think the flavor is definitely superior. However, it is about $10 for each one, so if you are making several of these for a large party and don't want to spend that kind of money, Pepperidge Farms also makes a frozen puff pastry that makes a perfectly fine substitute and is less than half the price.  For the cheese I used a four cheese blend and some freshly grated Parmesan, however feel free to let your imagination run wild here-any cheese will work. 


Delicata Squash and Caramelized Onion Tart
Serves 10-12 as an appetizer

-1 delicata squash, washed and dried
-olive oil 
-kosher salt and freshly ground pepper
-1 pkg DuFour classic puff pastry (thawed in fridge for 6 hours)
-3 large red onions, thickly sliced (this will yield more than you need for this recipe)
-1/2 stick unsalted butter
-red wine (Cab Sauvignon, Pinot Noir, Merlot)
-balsamic vinegar
-Quattro Fromagio blend of shredded cheese
-Parmesan (freshly grated) 
-fresh sage, 1 small bunch
-fresh parsley, chopped (a couple of Tbsp) 

For the Caramelized Onions:

The caramelized onions take a while to make so that's why I start them first if I am making the entire recipe start to finish. Place the onions in a large sauté pan over medium heat with a pinch of salt, a couple of grinds of black pepper and a half stick of butter. Once the butter is melted, reduce the temperature to low and stir occasionally for about 45 minutes until onions are nicely browned and caramelized. (If the pan seems too dry at any point you can add a drizzle of olive oil.) 
Add about a cup of red wine and increase heat to medium. Stir occasionally until almost all of the wine is evaporated then add about a quarter of a cup of balsamic vinegar and reduce. (An expensive balsamic vinegar is not necessary here)  When the liquid is evaporated, remove the onions from heat and cool. 


For the Pastry:

Preheat the oven to 375 degrees. 
Remove from packaging and flatten into a rectangle. You can use a rolling pin if you want, but I typically just use my hands. 
Using a sharp knife score ALMOST all of the way through the pastry about 1/3-1/2 inch around the perimeter of the pastry to make your outer crust. Next, take a fork and prick the crust all over within the perimeter of your crust. (This prevents the middle from puffing up too much.) 
Place the pastry on a parchment lined sheet pan and bake in a 375 degree oven for 15-20 minutes until lightly golden brown, rotating the pan half way through the baking time. 
Set aside the pastry to cool. (The pastry shell can be made up to 2 days before you need it. First COMPLETELY cool and then wrap with plastic wrap or store in an airtight container) 

While the puff pastry bakes, prepare your squash:

Slice the end off of the squash and removed the seeds with a spoon. 
Thinly slice the seeded squash into rings and toss with olive oil, salt and pepper in a medium sized bowl. Increase oven temp to 425 and roast squash for about ten minutes on a foil lined sheet pan until just tender. Set aside to cool. 

Assemble the Tart:

Spread the cheese evenly over the crust. 

Next, evenly distribute the delicata squash and sprinkle with the chopped parsley and add the sage chiffonade. To cut the sage leaves into a chiffonade stack the leaves into a small pile, roll them up and thinly slice them. You will end up with thin, pretty ribbons. 
 
Pop the whole thing back in the oven for 5-10 minutes until the cheese is melted. Top with some of the caramelized onions and cut into squares and serve. 

If you are making this for a party and want to do more ahead of time, you can assemble the entire tart a day in advance and bake for ten minutes to melt cheese before serving. You can serve the tart hot or at room temperature. I like it best warm. 


Monday, August 1, 2011

Summer Birthday Party Fun


I found these totally awesome sprinkle balls at Williams Sonoma.  They are HUGE and so pretty! I knew I just had to use them, so I came up with this Sprinktacular Cake.  It is SO easy to make and is so fun for a kids birthday party.  Everyone loved how it looked and it literally takes a few seconds for seconds for the final décor.  I only made my cake two layers high because we were having other cakes and cupcakes as well.  If this were going to be the only cake at the party I would make one 3 or 4 layers high for more of an impact. If you decide to go with 3 or 4 layers it is always a good idea to poke in about 4 skewers cut to the exact height of the filled cake so that it keeps the cake layers intact when it comes time to cutting-just don’t forget to remove them.  I recommend doing the final assembly on this cake less than 2 hours prior to serving so that the sprinkles don’t get soggy.  You can have all of the ingredients prepped and ready to go at least 4 hours prior to assembling.  (cake layers, strawberry filling, whipped cream(keep refrigerated), cake platter and sprinkles)


Sprinktacular! Summer Birthday Cake
-2 chocolate cake rounds 8 or 9 inch rounds(using your favorite recipe)
-2 pints fresh strawberries, washed and dried (see Strawberry note below)
-a smidge of vanilla bean paste (or vanilla extract-see note below)
-granulated cane sugar
-1.5 pints heavy whipping cream
-powdered sugar (3 Tbsp. or to taste)
-variety of different sized sprinkles (mine were a combo of Wilton and Williams-Sonoma)
Bake and cool cakes completely.  (This can be done the day before as long as you wrap them well with plastic wrap after completely cooling.) There is nothing worse than dry cake!! Next, roughly chop the strawberries and sprinkle with about a tablespoon of cane sugar and a little vanilla bean paste. Set aside while whipping the cream.  Whip heavy cream with a little vanilla bean paste and powdered sugar until soft peaks form.  (Do NOT overwhip!! Remember, you cannot undo overwhipped cream.  I like to beat the cream using an electric or stand mixer until I almost have soft peaks and then finish beating it by hand with a whisk.  This ensures that you won’t accidentally overbeat it.) Place bottom layer of cake on plate or platter that you will be using and spoon strawberries and accumulated juices on top.  Top with ½ of the whipped cream and another layer of cake and finish with a thick layer of whipped cream.  The strawberry juices will seep down into your bottom layer of cake, giving you an extra moist, strawberry infused layer.  Sprinkle the top with a dense layer of all of the different sprinkles and voila! You are done.

Vanilla Bean Paste: I love the vanilla bean paste because it has the little flecks of the seeds from the vanilla bean and isn’t as watery as the extract.  You used to only be able to purchase this from specialty stores like Williams Sonoma and Whole Foods, but lately I’ve seen it at a lot of conventional grocery stores as well.  The consistency of the paste is kind of like maple syrup or honey so I find that the best way to get some out if I only want a little, is to stick a clean table knife into the jar and then scrape off the amount that clings to it into my bowl of whatever I’m making.

Strawberry note: When I’m using strawberries in cakes, frosting, etc. I like them to be as dry and concentrated as possible so that things don’t get watered down.  What I do is rinse them and drain them and then place them in a 250 or 300 degree oven for about 10 minutes.  This isn’t long enough to cook them, but it will dry the residual water that is clinging to them off as well as help concentrate the sweet flavor of the berry.
cake and cupcake display

To go with my theme of fun, summery bright colors I made flag bunting using:
-sheets of scrapbooking paper (Mine were two different sizes, which in my opinion just added to the whimsical appearance of the bunting.  You can use just one size if you don’t like a random look.  I also bought paper mostly in colors of pinks, reds and oranges)

laying out flags in desired order

-brightly  colored cord ribbon
-white circular paper hole reinforce stickers
-glitter (love, love, love the various Martha Stewart glitters available at Michael’s)

stringing flags

-glue stick, craft glue
-hole puncher
-pom poms
-pinking shears and regular scissors
Cut each sheet of paper into 3 long triangular flags.  I used pinking shears for about 2/3 of my flags and regular scissors for the remainder.  Save the scraps for gluing on flags later for extra pizzazz if desired.  Punch two holes in the top corners of the flag and then place a reinforce sticker on both sides of the hole.  Decorate flags as desired.  Some of mine I left plain, while others I decorated with leftover scraps of other paper, glitter and pom poms.  If using the pom poms, be sure to use plenty of craft glue and then let them dry for at least 6 hrs before stringing them.  I glued the pom poms on some of the flags to make them look like upside down party hats.  Next lay the flags out in the order you would like them strung.   I tried to have one larger flag alternating with a smaller flag and always different papers next to each other.  I also dispersed the flags with the pom poms so they only appeared every once in a while.  I made each strand about 20 feet long, as I felt that was a manageable length to work with.  Next string the flags on the ribbon cording tying each end in a loose knot.  To store until ready to use, fold up in an accordion style. 

I purchased these tissue paper flower pom poms from the Martha Stewart crafts section at Michael's.  One package makes quite an impact! I purchased a package of the large pom poms, 2 packages of small pom poms and 2 packges of the tiny garland pom poms.


Fun birthday place cards I made


Saturday, July 23, 2011

Harry Potter's Hogwarts Feast


Coming up with the Harry Potter menu was very fun! The dessert ideas are endless since they talk about so many different desserts in the books.  It was a little harder to come up with vegetable side dishes, so some of them I simply made up! (Like Professor Sprout’s Super Salad) I can’t remember them ever eating salad at Hogwart’s, but I felt that this salad looked like something Professor Sprout would have cultivated in her Herbology class.  Please let me know what fun ideas you invent!

 
Hogwarts Feast:

Butterbeer:  Gingerale, Butterscotch Syrup, Cream Soda, Sparkling Mineral Water (Pour all ingredients into a large container-I used a large drink dispenser that has a spigot- and gently stir together with a whisk.  Note that you will need to stir about every 30-45 minutes as the butterscotch syrup will tend to settle to the bottom.  For glasses I had brightly colored red paper cups with red and white paper straws.)

Polyjuice Potion:  Mango, Nectarine, Mint, Lemon Juice and Agave Syrup (Puree fruit in a high powered blender like a Vita Mix with water until smooth. I wanted to add fresh kiwi to this drink to give it an even greener hue, but I didn’t have a ripe one.  I served this in a large pitcher)


Putrified Party Platter:
-Morbid Morbier (Morbier Cheese),
-Headless Huntsman Cheese (Huntsmen Striped Cheddar and Blue Cheese),
-Compressed Goblin Guts (Dried Fig and Almond Cake-you can find this in the cheese department of Whole Foods)
-Blood Stained Gouda (Red Wine Soaked Gouda)
-Crackers and Baguettes
-Roasted Pumpkin Seeds (I tossed them with a little Roasted Garlic Olive Oil, Canola Oil, Cayenne Pepper & Kosher Salt and then roasted them at 350 for about 10-15 minutes)
-Dehydrated Womping Willow Leaves (Kale Chips sold at Whole Foods and other Natural Markets)


Main:
-Cornish Pasties: Beef Tenderloin, Potatoes, Carrots, Leeks in a Flaky Pastry
Pie Crust (For these I made a filling by first boiling baby white potatoes in a heavily salted pot of water until tender.  Then I roughly cut/mashed them and stirred in a little butter and salt.  Next sautée the carrots and leeks with a little salt over low heat, for about an hour.  Dump that mixture in a large bowl with the potatoes and in the same skillet brown your chunks of meat.  I ended up chopping them pretty fine in a food processor once cooled.  Into the skillet add some brown gravy mix, water and chicken stock, bring to a boil.  Remove from heat and stir all ingredients together.  Make a basic pastry using about 2 cups all purpose flour, generous 2 cups whole wheat flour, 1 cup cold butter, 1 cup shortening, 1 Tbsp. kosher salt, 1 tsp. paprika, 2 Tbsp. sugar and about 5 Tbsp. ice water. Make the pastry in a food processor  and chill until ready.  Roll out and cut with a large round cookie cutter or any large round thing you have that will cut the dough.  Place a small amount of filling in the center of the dough and crimp edges together like you would for a turnover.  Bake at 400 for about 30-40 minutes until nicely browned.)
-Fried Bangers: I braised the sausages in a pot filled with beer, beef stock, onions and garlic then pan fried them in a little butter
-Buttered Peas

-Professor Sprouts Super Salad: Butter Lettuce, Baby Red Leaf Lettuce, Mixed Microgreens, Alfalfa Sprouts,
Julienned Zucchini, Red Quinoa, Wheat Berries, Fresh Figs with a Balsamic
Vinaigrette
-Hagrid's Rock Cakes: Seeded Farmers Bread
-Fresh Cherries and Watermelon


Desserts:
-Tentacula Seeds: Truffle Covered Corn Nuts (purchased from Whole Foods-they have a Spanish name that I can’t recall…something like Piedras de Cocoa or something along those lines.  For displaying these I used a votive candle holder)


-Mandrake Seeds: Chocolate Pearls (purchased from Whole Foods)


-Wormtails: Gummy Worms (I had a very cool vial/vase for displaying these)


-Ton Tonks Toffee: Lula's of Monterey Handmade Toffee with Nuts (I can’t speak highly enough of this company! They make an absolutely fabulous English Toffee)

-Olivander's Licorice Wands: Multicolor Twizzlers Dipped in White Chocolate with
Sprinkles (In my opinion these overly processed food coloring and sugar bombs are gross, but they looked so cute.)

-Kreture's Cockroach Clusters: Chocolate and Crunchy Peanut Butter Covered Chow Mein Noodles(Melted dark chocolate chunks and then stirred in crunchy peanut butter and tossed in the chow mein noodles.  I did use Jiff peanut butter because I thought the all natural kind might separate.  I displayed these in a very tall cone shaped vase.  To do this I put wadded up paper towels in the bottom 2/3 of the vase and piled the clusters on top


-Bertie Bott's Every Flavor Bean: Assorted Jelly Belly's displayed in short and tall clear glasses


My cousin, Montana getting in the spirit!


Followers