Showing posts with label entrees. Show all posts

Sunday, July 10, 2011

Zucchini and Yellow Squash Galette


While at the farmers market on Friday, I found the most brightly colored yellow squash I have ever seen.  It was almost more orange than yellow. (I have to insert here that unfortunately I have messed up the settings on my phone’s camera and all of the pictures I took for this post do not do justice to the colors of veggies) I thought it would be fun to make a brightly colored galette for dinner that night, so I grabbed some yellow squash, zucchini, parsley and basil. I found a nice, locally made Gruyere style cheese which I decided would be perfect in the galette. 
 I also found perfectly ripe cherries, peaches and some fresh haricots verts which I can never resist.  Next, I went off to Whole Foods to gather ingredients for the rest of my dinner.  I ended up making
§  Crostini with Ricotta & Olive Tapenade (used up leftover ricotta filling from my galette)
§  Arugula Salad with a Lemon Dressing, California Green Ripe Olives, Aged English Farmhouse Cheddar, Hearts of Palm and Avocado (Inspiration from a delicious salad I recently had at Carmel Belle)
§  Pan Seared Dover Sole with a Lemony Sauvignon Blanc Sauce and Capers
§  Zucchini and Yellow Squash Galette
§  Steamed Haricots Verts with a dusting of Pink Murray River Salt
§  Fresh Cherries and Peaches

I served the galette as a side dish, but it could easily be a main course.  I love making galettes, both savory and sweet because 1) I am a sucker for anything with a homemade crust 2) Galettes are kind of like me: free form and low stress (don’t worry-they are great no matter how bad you are at rolling out a circular shape) 3) They are just plain EASIER to serve than a pie.   Nothing annoys me more than when a piece of pie does not come out of the dish perfectly. (and it almost never does) Galettes can be cut like a pizza.  Easy peasy!  This galette was the an adaptation from a plethora of recipes including: the cookbook Pies, Tarts and Pastries(unfortunately I can’t remember the author right now), a Williams-Sonoma cookbook, Cooks Illustrated website, Smitten Kitchen blog and a recent picture I saw while shopping in Sur La Table.  Remember that the possibilities are endless and you can truly use whatever you happen to like or find at the store that day.  This recipe could be made Vegan by substituting Spectrum Naturals Shortening for the butter and eliminating the sour cream and egg wash altogether.  The ricotta filling could be made using drained tofu, nutritional yeast and a little olive oil. (I would crumble and drain it in a colander over night.) 
Zucchini and Yellow Squash Galette serves 10 as a main course
Pastry:
1 ¼ cups Whole Wheat Pastry Flour
1 ¼ cups All Purpose Flour
1 Tbsp. Kosher Salt
2 Sticks Unsalted Butter, cut into 16 pieces and frozen for 30 minutes
2 Tbsp. Fresh Lemon Juice
½ cup Sour Cream
¼- ½  Cup Ice Water
Filling:
3 small-medium Zucchini, sliced into ¼ inch slices
3 small Yellow Squash, sliced into ¼ inch slices
3 large garlic cloves, crushed
1 ¼ cups Fresh, Whole Milk Ricotta
½ cup Freshly Grated Parmesan Cheese
¾ cup Freshly Grated Gruyere Cheese
Kosher Salt & Freshly Grated Black Pepper, to taste
2 Tbsp. Chopped Parsley (optional)
6 large Basil leaves, cut into chiffonade (see note below)
Egg Wash:
1 Egg Yolk mixed with 1 tsp. Water
For Pastry:  In the bowl of a food processor, pulse both types of flour and kosher salt.  (Usually I drape a kitchen towel over the entire food processor so flour doesn’t leak out)  Dump the butter pieces in, and pulse until flour resembles a coarse cornmeal in texture.  Add lemon juice and sour cream, pulse a few times and then slowly add the ice water, pulsing in between each addition until dough holds together when you pick up a clump of it.  (You will probably need only half of the water)  Dump the mixture out onto a large sheet of plastic wrap, divide in half and shape each half into a disk.  Wrap both disks in plastic wrap and place in refrigerator for 30-45 minutes.  While dough is chilling, prepare your filling.  Preheat oven to 400 degrees F.
Filling:  Lay zucchini and yellow squash out in a single layer on paper towels and sprinkle with kosher salt to bring out the excess moisture. (Ideally, let the zucchini and yellow squash sit for about thirty minutes to really draw out the water.) In a medium sized bowl, mix garlic, ricotta, parmesan, gruyere, salt, pepper and parsley. Taste and add more salt and pepper if needed. 
notice all of the moisture droplets that have been drawn out
Roll out Pastry:  On a floured work surface roll out one disk of pastry, leaving the other one in the refrigerator until you are ready to roll it out.  Roll into about a 12-14 inch circle.  Don’t worry if your circle is exact, mine never are.  Remember while rolling out the pastry to occasionally pick it up and dust the work surface with more flour, so you don’t end up with dough that is glued to your counter.  Transfer the pastry to a parchment paper lined sheet pan. 
Fill and Bake:  Spread about ½ the ricotta mixture onto your circle of pastry leaving about an inch border all the way around.  Thoroughly blot all of your squash dry with a wadded up paper towel.  You will notice that a lot of water will be beaded on top of it.  Layer the zucchini and yellow squash on top of the ricotta in the design of your choice.  I chose to do concentric circles alternating between zucchini and yellow squash.  Try to do fairly tight circles because the squash will shrink during the baking process.  Fold the pastry up over the edge all around.  Repeat with remaining pastry disk. 
 (You will most likely have more ricotta filling than you need-feel free to spread this on crackers. I made some quick crostini out of left over bread, spread the ricotta mixture on top, added about a teaspoon of olive tapenade and a sliver of red bell pepper for a quick hors d’oeuvres.)  Brush the egg wash over the pastry with a pastry brush.  If you would like, you can also brush the zucchini layers with olive oil.  Sprinkle with salt and pepper and bake for about 45 minutes or until crust is nicely browned.   Remove from oven and sprinkle with basil chiffonade.  (This recipe can easily be halved)

Chiffonade: a chiffonade cut is basically when you take something that has broad, pliable leaves aka basil, sage, spinach and cut it into thin shred-like ribbons.  To achieve this take about five basil leaves and stack them on top of each other.  Roll the stack horizontally and using a sharp knife, thinly slice your roll.  You will end up with thin, perfect ribbons.   

Thursday, April 7, 2011

Grilled Lamb Rib Chops with Meyer Lemon and Herbs, Sauteed Eggplant with Cherry Tomatoes and Honey Roasted Heirloom Carrots


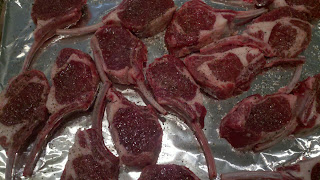
Grilled Lamb Rib Chops with Meyer Lemon and Herbs
 -16 Lamb Rib Chops, frenched
-4 cloves garlic
-1 shallot
-Kosher Salt and Freshly Ground Black Pepper
-4 Tbsp. Fresh Oregano
-1 Tbsp. Sugar
-1 Tbsp. Fresh Rosemary
-2 Tbsp. Fresh Chervil or Parsley
-Extra Virgin Olive Oil
-Zest and Juice of 1 Meyer Lemon
-Balsamic Glaze (for plating)
Directions:  Place lamb rib chops on foil lined sheet pan and sprinkle both sides with salt and pepper.  Place garlic, shallot, sugar, oregano, chervil or parsley and rosemary in the bowl of a food processor and pulse until all ingredients are well minced and incorporated.  Place a spoonful of herb mixture on each lamb rib chop, cover sheet pan with saran wrap and place in fridge for one hour.  Meanwhile whisk together about 1/2 cup of olive oil with zest and lemon juice. Turn chops and coat the other side, recover and place in fridge for another hour.  Preheat gas grill to high heat or prepare charcoal grill for direct heat grilling.  Preheat oven to 400 degrees. Remove chops from fridge and drizzle with lemon olive oil mixture and let sit out for one hour.  Grill chops for about 1 minute on each side and return to sheet pan.  Place lamb in oven to finish cooking for about 5 more minutes or until instant read thermometer reads 120 when inserted. (For rare)  Remove from oven and set aside until ready to plate.  Remember that the lamb will continue to cook as it sits.  When ready to plate place lamb rib chop on serving dish and drizzle with balsamic glaze.

Sauteed Eggplant with Cherry Tomatoes
-2 Eggplants, washed and some peel removed (I like to remove some, but not all of the peel, just so there isn’t quite so much peel in the finished dish.  You can remove all of it or none of it depending on your personal preference.)
-Extra Virgin Olive Oil
-1 Yellow Onion, Chopped
-Chopped Rosemary (about a Tablespoon or less)
-Chopped Parsley
-Kosher Salt and Freshly Ground Black Pepper
-Cherry Tomatoes
Directions:  Cut eggplant into cubes and place in a mesh strainer over a bowl or a colander and sprinkle with salt.  Let sit about an hour.  Coat bottom of large sauté pan with olive oil and sauté onion on medium low heat for about 20 minutes. Add eggplant and a little more olive oil if needed and continue to sauté over medium low heat for about an hour. (If you have any extra of the lemon olive oil mixture from the lamb rib chops, feel free to add that)  Add rosemary, parsley and black pepper and continue to sauté until eggplant is soft. Add cherry tomatoes and continue to gently sauté an additional ten minutes. (Try not to break up the tomatoes.) Taste and adjust seasoning for salt and pepper.


Honey Roasted Heirloom Carrots
-2 pounds Multi Color, Heirloom Carrots
-3 Tbsp. Parsley or Chervil, chopped  
-1 Tbsp. Chives, chopped
-1 Tbsp. Extra Virgin Olive Oil
-3 Tbsp. Honey
-1 Tbsp. Unsalted Butter
-Kosher Salt and Freshly Ground Black Pepper
-3 Tbsp. Chicken Stock
Directions: Preheat oven to 425 degrees F. (Can do at same temp as lamb, if you only have one oven.) Scrub or peel carrots and cut lengthwise in half.  Toss all ingredients together in a large bowl.  Dump onto a foil lined sheet pan and cover with aluminum foil.  Place in oven for 10 minutes and then remove foil cover.  Roast an additional 5-10 minutes until carrots are tender and liquid has evaporated. 


As a first course to this meal I served a salad of Red Leaf Lettuce with Marcona Almonds, Manchego, Grapes, Roasted Shrimp and a Balsamic Honey Vinaigrette.  To finish, I passed a beautiful bowl of fresh berries and clementines. 

Monday, April 4, 2011

Spring Herb and Vegetable Salad, Herb Grilled Chicken and Salmon and Baked Sweet Potato Wedges


Spring Herb and Vegetable Salad
-1 package Mixed Greens or other Lettuce
-1 bunch Grilled Asparagus, tossed with about a Tbsp. of mixed herbs (see previous blog for recipe)
-2 cups Red and Yellow Cherry, Grape or Pear Tomatoes all halved lengthwise
-1/2 pound Haricots Verts or Green Beans, blanched and set on a dish towel to drain
-8 eggs, hardboiled, peeled and halved lengthwise
-1/2 cup pumpkin seeds/pepitas, roasted
-1 bunch dill, chopped
-1 bunch Parsley or Chervil, chopped
-2 Tbsp. Oregano, chopped
-1 small bunch of Chives, chopped
-Extra Virgin Olive Oil
-Juice of 2 Lemons
-Apple Cider Vinegar (I love Bragg’s)
-2 cloves Garlic, minced or crushed
-2 Tbsp. Honey
-Kosher Salt and Freshly Ground Black Pepper, (optional: Murray River Pink Salt for finishing)
Directions: Make dressing whisking together last 6 ingredients.  I didn’t list an amount for the oil, because it is really a matter of personal preference.  To get a lighter dressing, both in calories and to not weigh the lettuce down I like to do a 1:1 ratio of vinegar/lemon juice to oil.  Usually people do at least a 2:1 oil, vinegar ratio but I think that is too heavy for this kind of lettuce.  Plus, this way it’s lower in fat.  To the dressing add some (not all) of your herbs.  Reserve extra herbs for grilled chicken and salmon.  In a large bowl toss the greens with just enough salad dressing to lightly coat and transfer to the middle of your serving bowl. In the same bowl toss the blanched and drained haricots verts with about a tablespoon of dressing or just enough to coat them and place them on the side of the greens in the serving bowl.  Repeat with the tomatoes and eggs adding a little more chives to the eggs.  Sprinkle roasted pumpkin seeds over greens.  I like to cluster a large bunch of herbs on the side.  Sprinkle entire salad with a little more salt and pepper and serve.    

Herb Grilled Chicken and Salmon
-1 pound center cut, skin on, Salmon Filet, pinbones removed and cut into individual portions
-4 Boneless, Skinless Chicken Breasts
-Herb Dressing from Salad recipe
-2 Lemons
-Extra Chopped Herbs from Salad recipe
-Extra Herbs for Garnish
-Olive Oil Cooking Spray or other nonstick cooking spray
-2 Tbsp. White Wine or Chicken Stock
-Kosher Salt and Freshly Ground Black Pepper
Directions: Preheat Gas Grill to high heat and preheat oven to 400 degrees.  Season salmon and chicken with salt and pepper and place each on a separate sheet pan lined with aluminum foil.  Spray salmon and chicken with olive oil spray. Grill Salmon flesh side down for about one minute or until nice grill marks appear and transfer to sheet pan.  Grill chicken about one minute on each side and transfer to sheet pan.  Drizzle chicken with some of the herb dressing and pour 2 Tbsp. wine or chicken stock in sheet pan and cover with foil.  Place chicken in oven and bake about 15 minutes until done. Drizzle salmon with some of the herb dressing and bake, uncovered for 5-10 minutes until done.  Sprinkle the juice of one lemon over the salmon and chicken.  Sprinkle both chicken and salmon with extra herbs and place on a platter, garnishing with sliced lemon and a small bunch of fresh herbs or edible flowers and serve alongside the salad.  **Note: I always cook the salmon with the skin on to keep it moist.  Once it is cooked, slide a thin metal spatula between the skin and the flesh, leaving the skin on the foil lined sheet pan to throw away. 

Baked Sweet Potato Wedges
-4 large Sweet Potatoes, peel left on, scrubbed, washed and cut into wedges
-Olive Oil/Canola Oil
-Kosher Salt and Freshly Ground Black Pepper
-Dried Oregano
-Garlic Salt
Directions: Preheat oven to 425 degrees F.  Line two sheet pans with aluminum foil.  In a large bowl toss the sweet potato wedges with enough oil to thoroughly coat, salt, pepper, oregano, and garlic salt.  (Yes, I know, two salts so be careful not to make them overly salty.)  Drizzle a little oil onto sheet pans and spread around.  Place wedges on sheet pans and put in oven for 20 minutes.  Flip wedges to other side and bake an additional 15 minutes or until done. 

Sunday, April 3, 2011

Barbecued Chicken

Barbecued Chicken, so basic, yet so satisfyingly delicious on a warm afternoon.  Unfortunately we often go to backyard barbecues and eat grilled chicken that is as dry as old shoe leather.  Using this technique of starting on the grill and finishing in the oven will give you that wonderful charred and smoky taste of the grill without sacrificing all of the moisture of your meat.  Making your own barbecue sauce is really very easy, and while it takes a few hours to cook, most of that time it is simmering unattended, leaving you free to prepare all of the other ingredients of your meal.  Remember to add or subtract ingredients to suit your tastes when making the barbecue sauce.  You won’t be disappointed you took the time to make your own, it is so good!! I suggest making a double batch and freezing it for later use. 

Barbecued Chicken
-4 Boneless, Skin-On Chicken Thighs and 4 Breasts, 6 Drumsticks
-Kosher Salt and Freshly Ground Black Pepper
-Homemade Barbecue Sauce (see recipe below)
-Chicken Stock (homemade or low-sodium if store bought)

Directions:  Preheat gas grill to high heat or prepare charcoal grill for direct heat cooking. Preheat oven to 350 degrees F.  Season chicken with salt and pepper and toss with about 1 cup of barbecue sauce or enough so that each piece is evenly coated.  Grill chicken over high heat, about one minute per side, or until there are nice grill marks on each side.  Remove chicken to a foil lined sheet pan that has been sprayed with non stick cooking spray.  Place a spoonful of barbecue sauce on each piece of chicken, and then brush evenly over the surface.  Pour about 2-3 Tablespoons of chicken stock around the chicken pieces, cover sheet pan with foil and place in oven for about 15 minutes.  Remove foil and bake 5 more minutes or until breasts are done.  Bake an additional 5 minutes until thighs and drumsticks are done.  Arrange on a platter and pass additional barbecue sauce on the side. 

Barbecue Sauce:
-1 stick of Unsalted Butter
-1 Yellow Onion, chopped
-1 can Tomato Paste
-1 bottle of Ketchup
-1 tsp. Crushed Red Pepper Flakes
-3 cloves Garlic, crushed or minced
-3/4 cup Dark Brown Sugar
-2 Tbsp. Molasses
-2 Tbsp. Honey
-Freshly Black Pepper
-1.5 tsp. Dry Mustard Powder
-1/2 cup Apple Cider Vinegar
-2 Tbsp. Worcestershire Sauce
-Juice from ½ of a Lemon
-1 tsp. Paprika
-1 tsp. Frank’s Hot Sauce, or your favorite Hot Sauce
-1/2 dry red wine (optional)

Directions: Melt butter and add chopped onions.  Sauté onions in butter and turn down to low heat and cook for about 20 minutes.  Add remaining ingredients and simmer over low heat, stirring occasionally for at least 2 hours. (4 hours gives it a much richer, deeper flavor) After an hour of cooking, taste the sauce and add more of certain ingredients depending on what you like.  If the sauce ever seems thick, you can always add few tablespoons of wine or chicken stock.  Once made, the sauce freezes beautifully for up to 3 months.    


Wednesday, March 30, 2011

Osso Buco


Osso Buco is the perfect dish to serve on a chilly day.  It is also a great dish to serve to guests because it can be made in advance and won't be overcooked if your guests are late.  While it seems like there are a lot of steps, it is actually quite a simple and foolproof recipe.  Feel free to change up the herbs to suit your tastes.  I like to serve mine with polenta, but risotto would also be a great option.  Once you have served your delicious dish, be sure to save the delicious stew that the meat has been cooked in to make a fabulous minestrone soup.   You can either have it the next day or freeze it for up to a month. 
Osso Buco
-10 veal shanks, about 2-3 inches thick, tied around circumference with kitchen twine
-Kosher Salt and Freshly Ground Black Pepper
-Extra Virgin Olive Oil
-Canola Oil
-3 large Carrots, sliced into ¼ inch rounds
-1 large Yellow Onion, coarsely chopped
-3 Celery Ribs, coarsely chopped
-1 jar of your favorite Marinara Sauce (I currently love a brand called Mom’s)
-1 28 oz. can Crushed Tomatoes
-4 cups of Chicken Stock, homemade if you have it, low sodium if store bought
-8 cloves garlic, minced or crushed
-4 Tbsp. fresh Thyme, chopped
-1 small sprig fresh Rosemary
-2 rinds of Parmesan Cheese (see note below) 
-1/2 a bottle of Sauvignon Blanc or other dry white wine
-1 recipe of Gremolata

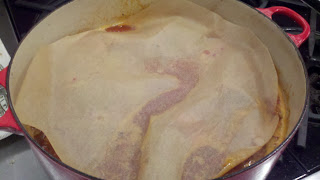
Directions:  Preheat oven to 350 degrees F. (You will most likely need to remove the top rack in your oven in order for the pot to fit.)  Sprinkle shanks liberally with kosher salt and pepper.  In a heavy duty pot, like a Le Creuset, heat about 1 Tbsp. each of olive oil and canola oil until almost smoking.  Place shanks in pan to sear each side, about 10 minutes total.  Do this in a couple of batches so that the pan is not overcrowded.  Remove seared shanks to a plate or pan, while searing the second batch.  Reduce heat to medium and add carrots, onions and celery and cook stirring often until golden and slightly softened, about 10 minutes.  Add the Marinara Sauce, Crushed Tomatoes, Chicken Stock, Garlic, Thyme, Rosemary, Parmesan Rinds, Sauvignon Blanc and bring to a boil.  Place shanks back into pot along with any accumulated juices on plate.  You may have to place the shanks sideways in order to fit them all in the pot in one layer.  Make sure shanks are covered at least ¾ of the way up, if not add a little more stock, crushed tomatoes or water.   Cut a parchment paper round to fit pot and place directly on shanks and cover pot with lid. Place in oven for 2.5 to 3 hours, or until meat is almost falling off the bone.  (This is why I tie the shanks so that the meat doesn’t fall off the bone)  To serve, place a spoonful of creamy polenta in the bottom of a shallow bowl and place shank on top along with a little of tomato vegetable mixture.  Since this is a very rich dish, I like to serve it with simply steamed haricots verts.  Sprinkle with a little of the Gremolata and pass extra Gremolata at table.  For those more adventurous eaters, try the marrow in the center of the bone-it is delicious.  Enjoy!
Gremolata
1 Bunch Italian Parsley, chopped
1 clove garlic, minced
Zest of 2 Lemons
Kosher Salt and Pepper
½ cup Pinenuts Toasted (optional)
Directions: Toss all ingredients together with a fork.


Note: The Parmesan rinds called for in the recipe are basically the hard, outer edge of Parmigiano Reggiano.  Some markets sell the rinds separately for a lower price per pound than the whole block of cheese.  If not, reserve your own when grating a block of parmesan for other uses.  It adds great flavor to soups and stews.   

Followers